
Just to keep the advice available
i-give-you-perfect-white-balance-everytime

5) Now, turn off the middle layer and the original background photo will now have the correct white balance.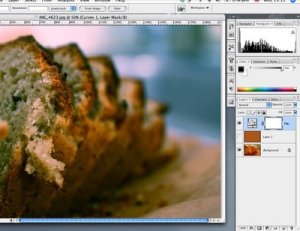
i-give-you-perfect-white-balance-everytime
So, here we are…. February year 2009. Many things have happened since New Year, such as the world is now creeping slowly into recession, unemployment numbers are getting worse, the USA has elected a new President (I have high hopes for this guy but he needs time and 4 years is not gonna be enough) and my baby daughter had grown 2 more milk teeth. Anyway, the year of Ox will hopefully bring better luck to all.
Back to the subject…….
Digital Cameras are getting better and better, but they still cannot compete with human eyes. This is especially true in situations where the lights are tricky to read. For those who are lucky enough to have the opportunity to play with the Adobe Photoshop but too poor to afford a white balance Grey card (How many do you see use one!!), I will show you a neat little trick to get the white balance spot on, time after time!
Here is a photo that was taken under halogen lighting, which throws a nasty orange cast to the subject. There are many ways to correct this but they are no where near as simple and as consistent than what I am about to show you, we will try to correct this in less than 1 minutes and that I promise you.
1) Duplicate the photo in your method of choice (and I don’t mean by drawing)
2) Go to the top menu> Filter>Blur>Average, this Average filter is by no mean ‘average’, it determines the average colour of the picture, based on the colour value of each pixel in the image and fills the image window with that colour. By now, the photo will transform into one single colour, in this case, the brown colour. Do not panic!
(In knowing the overall colour, it’s also a good way to determine a suitable border or frame colour.)
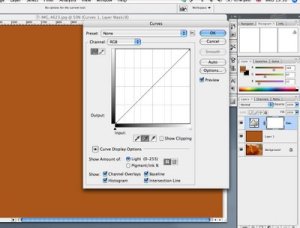
3) Now create a ‘curve’ adjustment layer by clicking on the adjustment icon on the layers palette.
4) Select the handpicker in the middle to set the grey point, then click anywhere on the middle layer. This will transform the brown colour into 50% Grey.
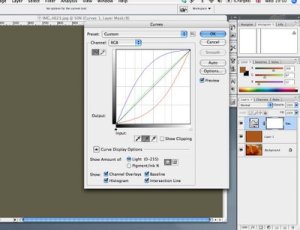
5) Now, turn off the middle layer and the original background photo will now have the correct white balance.
It really is ‘a piece of cake’, agree?
No comments:
Post a Comment